VideoEncoder
The VideoEncoder allows transforming VideoFrame objects into EncodedVideoChunk objects allowing you to write rendered / raw video frames to a compressed/encoded video stream or file.
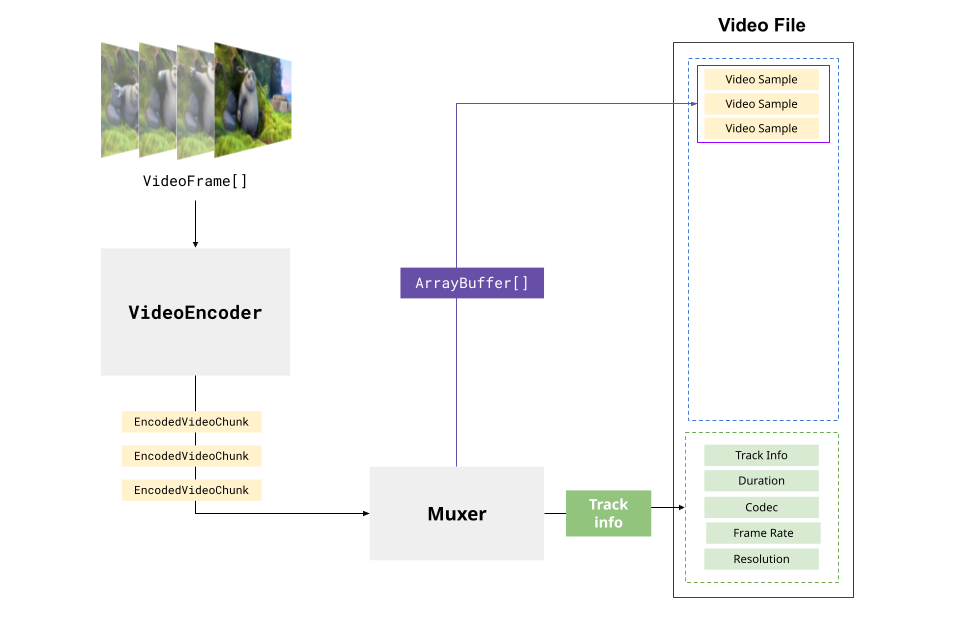
The VideoEncoder is the mirror operation to the VideoDecoder, but unlike decoding, where EncodedVideoChunk already has metadata (like codec, framerate, timestamps) from the video source…

… when using a VideoEncoder, your application needs to supply a lot of the metadata (like codec, framerate and timestamps) to the encoder and frames.
The basic “hello world” API for the decoder works like this:
// Just capture the contents of a dummy canvasconst canvas = new OffscreenCanvas(1280, 720);const encoder = new VideoEncoder({    output: function(chunk: EncodedVideoChunk, meta: any){        // Do something with the chunk    },    error: function(e: any)=> console.warn(e);});
encoder.configure({    'codec': 'vp9.00.10.08.00',     width: 1280,     height: 720,     bitrate: 1000000 //1 MBPS,     framerate: 25});
let framesSent = 0;const start = performance.now();
setInterval(function(){    const currentTimeMicroSeconds = (performance.now() - start)*1e3;    const frame = new VideoFrame(canvas, {timestamp: currentTimeMicroSeconds });    encoder.encode(frame, {keyFrame: framesSent%60 ==0}); //Key Frame every 60 frames;    frame.close();    framesSent++;}, 40);  // Capture a frame every 40 ms (25fps)
Like the VideoDecoder though, there is a big gap between hello world demos and production pipelines, so in this article we’ll focus specifically on the VideoEncoder and how to actually manage an encoder in a production pipeline.
Mediabunny abstracts the VideoEncoder away, simplifying a lot of the pipeline and process management, so if you want to use Mediabunny, this section isn’t necessary, but might still be helpful to understand how WebCodecs works.
Configuration
Section titled “Configuration”Unlike the VideoDecoder, where you get the decoding config from the video source file/stream, you have a choice on how to encode your video, and you’d specify your encoding preferences via encoder.configure(config) as shown below
encoder.configure({ 'codec': 'vp9.00.10.08.00', // Codec string width: 1280, height: 720, bitrate: 1000000 //bitrate is related to quality framerate: 25, latencyMode: "quality"});You can see a more comprehensive summary of the options on MDN but I’ll cover the practical ones here:
You need to specify a codec string such as ‘vp9.00.10.08.00’ or ‘avc1.42003e’. Choosing a codec is a whole thing, you can see the codecs page for practical guidance on how to choose one.
Bitrate
Section titled “Bitrate”Video codecs apply a trade-off between file size and video quality, where you can have high quality video with large file sizes, or you can have compact files with low quality video. This tradeoff is specified in the bitrate, where higher bitrates result in larger files but higher quality.
Here’s a visualization of how bitrate affects quality, with the same 1080p file transcoded at different bitrates

300 kbps

1 Mbps

3 Mbps

10 Mbps
Here are typical recommendations for bitrate settings [1]
| Resolution | Bitrate (30fps) | Bitrate (60fps) |
|---|---|---|
| 4K | 13-20 Mbps | 20-30 Mbps |
| 1080p | 4.5-6 Mbps | 6-9 Mbps |
| 720p | 2-4 Mbps | 3-6 Mbps |
| 480p | 1.5-2 Mbps | 2-3 Mbps |
| 360p | 0.5-1 Mbps | 1-1.5 Mbps |
| 240p | 300-500 kbps | 500-800 kbps |
If you just want something quick and easy that works, here is a quick utility function:
function getBitrate(width, height, fps, quality = 'good') {    const pixels = width * height;
    const qualityFactors = {      'low': 0.05,      'good': 0.08,      'high': 0.10,      'very-high': 0.15    };
    const factor = qualityFactors[quality] || qualityFactors['good'];
    // Returns bitrate in bits per second    return pixels * fps * factor;  }
Also available via webcodecs-utils
import { getBitrate } from 'webcodecs-utils'Latency mode
Section titled “Latency mode”Video encoders also have a tradeoff between speed and quality, where you can sacrifice some quality for faster encoding, which would be helpful in the scenario of streaming.
Basically, if you are live streaming or really need to improve encoding speed, use latencyMode: “realtime” , otherwise if you expect to output a video file, use latencyMode: “quality” (the default).
encode() and Timestamps
Section titled “encode() and Timestamps”One of the major differences between encoding and decoding is that when encoding video, you will need to provide information (like keyFrames, timestamps), instead of getting it from the decoder.
Timestamp:
Section titled “Timestamp:”Presumably if you are encoding a video via WebCodecs, you have a clear idea of what the timeline of the video to be written will look like.
If you are just transcoding a video, or performing some basic filter or transform, then it’s quite a bit easier in that the source video timeline is identical to the destination video timeline, and you would have a 1:1 correspondence from source frames to destination frames, and just pass timestamps from the source frames to the destination frames.
If you are generating video programatically or have a video editing application with a composition and a timeline, then those details you’d need to manage in your app’s logic.
In either case, you’d need to specify the timestamp for each frame that gets encoded.
VideoDecoder
If your video frame comes from a VideoDecoder (decoding), the resulting frame will already have a timestamp associated with it. If you are just transcoding a video and the timestamp is correct, you don’t need to do anything. If the timestamp is not correct (e.g. if you are making cuts in the video, or otherwise adjusting the timeline), you’ll need to construct a new frame with your desired timestamp.
new VideoFrame(frame, {timestamp: /*adjustedTimestamp in microseconds}*/});VideoElement
IF you construct a VideoFrame from a <video> element as in new VideoFrame(<HTMLVideoElement> video), then by default it will have the timestamp from the underlying video. Otherwise, you can manually override it by specifying the timestamp
Any other method
IF you construct a VideoFrame from any other source (<canvas>, ImageBitmap etc…), you’ll need to specify the timestamp
new VideoFrame(canvas, {timestamp: /*timestamp in microseconds*/});In either case, just keep in mind that the timestamps used in VideoFrame are in microseconds, even if the encoder config uses frames/second and bits/second for the framerate and bitrate properties respectively.
KeyFrames:
Section titled “KeyFrames:”The other main thing you’ll need to decide is how often you want to specify key frames (covered here), and you’d specify which frames to designate as key frames in the encoder.encode() call, specifically:
encoder.encode(frame, {keyFrame: /*boolean*/});The first frame you encode needs to be a key frame. Subsequent frames, you are given full flexibility to choose, with the tradeoff that more key frames results in larger file sizes, but fewer key frames can result in playback issues. Typical values range from every 30 frames to 60 frames.
A common strategy is just to keep track of how many frames have been encoded thus far and just choose to indicate every nth frame as a key frame
encoder.encode(frame, {keyFrame: framesSent%60 ==0}); //Key Frame every 60 frames;framesSent++;Practical Considerations
Section titled “Practical Considerations”Before we go ahead and set up an actual encoding loop, here are a few things to keep in mind:
Encoding can be slow
Section titled “Encoding can be slow”Encoding performance varies dramatically across devices and browsers, and is in general much slower than decoding. Here are some benchmarks for encoding and decoding of 1080p, 30fps, h264 video across a variety of devices and browsers
| Device | Tier | Browser | Encode FPS | Decode FPS |
|---|---|---|---|---|
| Windows Netbook | Low | Chrome | 11 | 540 |
| Windows Netbook | Low | Firefox | 25 | 30 |
| Samsung Chromebook | Low | Chrome | 60 | 600 |
| Ubuntu Lenovo | Mid | Chrome | 100 | 350 |
| Ubuntu Lenovo | Mid | Firefox | 80 | 300 |
| iPhone 16 Pro | High | Chrome | 120 | 600 |
| iPhone 16 Pro | High | Safari | 12 | 600 |
| Samsung Galaxy S25 | High | Chrome | 200 | 600 |
| Macbook Pro M4 | High | Chrome | 200 | 1200 |
| Macbook Pro M4 | High | Firefox | 80 | 600 |
| Macbook Pro M4 | High | Safari | 200 | 600 |
Another Rube-Goldberg machine
Section titled “Another Rube-Goldberg machine”Much like the VideoDecoder, you shouldn’t think of the encode() function as some async task, it’s better to treat the encoder as a Rube Goldberg machine, where you continuously feed frames, feeding frames in pushes the process along, and encoded chunks come out the other end.
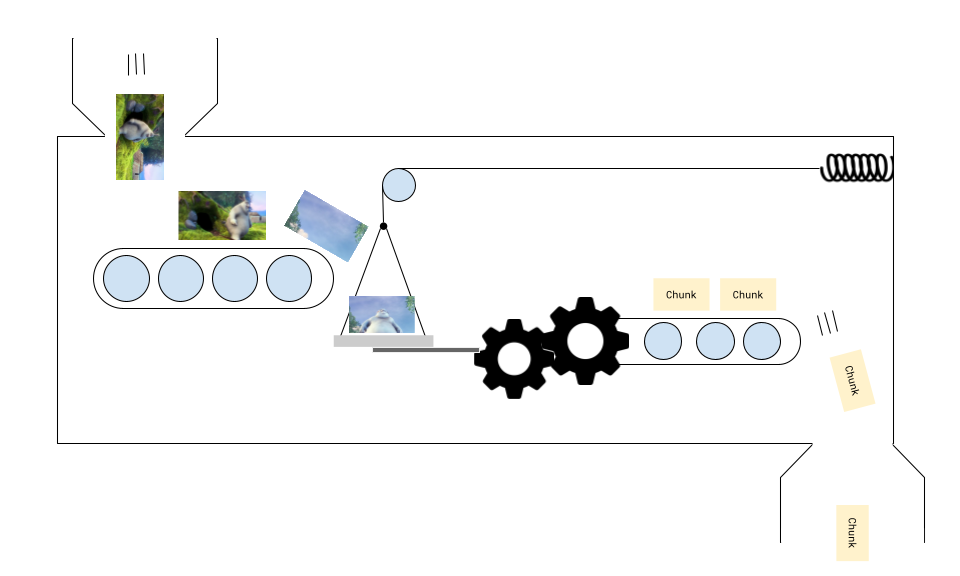
You might need to feed in a few frames before the encoder starts outputting chunks, and when you’ve finished feeding frames, the last few chunks might get ‘stuck’ (because there’s nothing to push the frames along), requiring a call to encoder.flush()
Chaining Pipelines
Section titled “Chaining Pipelines”Building an encoder in isolation is all good and well, but if the source of your video frames is, at some point, video from a VideoDecoder (as in transcoding), you are now chaining a VideoDecoder and a VideoEncoder together.
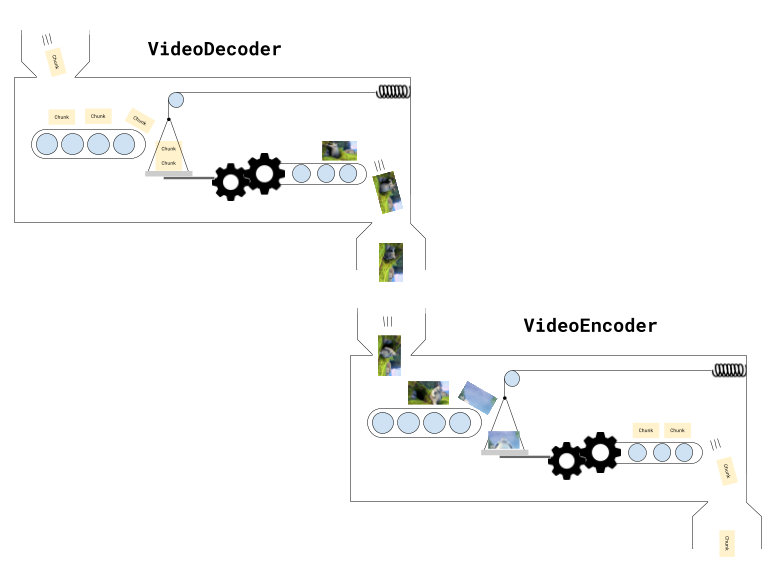
This makes things complicated because now you have two machines which can both get stuck, and keeping track of frames and chunks becomes more challenging.
You now also have to manage memory bottlenecks at multiple points (decoder.decodeQueueSize, number of open VideoFrame objects, encoder.encodeQueueSize).
When you build a pipeline with both a VideoDecoder and VideoEncoder in WebCodecs, you really do have to pay attention to data flows, progress and memory bottlenecks.
Some of this gets easier with libraries like Mediabunny, and later in design patterns, we’ll include full working examples for transcoding, playback and editing that you can copy and modify.
WebGPU Rendering
Section titled “WebGPU Rendering”If you have some type of rendering pipeline involving WebGPU or WebGL (such as in a video editing application), you’d be feeding one or more video frames from the decoder into a rendering pipeline, the output of which would then go into an encoder.
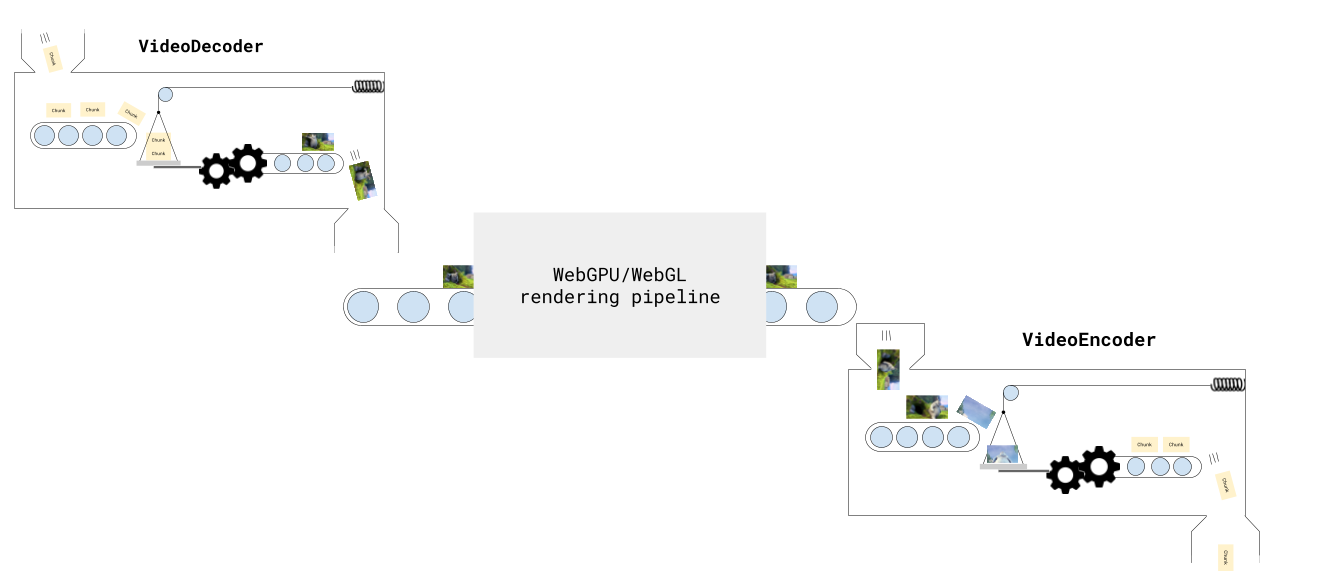
Fortunately, because rendering can be treated like a simple async task, it doesn’t add much complexity to the overall pipeline. Just keep in mind:
Do not wait for the the GPU to finish its work before sending the frames for encoding
e.g, don’t run
render(<VideoFrame> frame); // WebGPU shader pipelineawait device.queue.onSubmittedWorkDone();encoder.encode(renderCanvas)You will end up encoding blank frames. Instead, just encode directly after running the WebGPU shaders.
render(<VideoFrame> frame); //WebGPU shader pipelineencoder.encode(renderCanvas)I don’t know why it works like this, but it does.
Encoding queue
Section titled “Encoding queue”Like with the VideoDecoder, the VideoEncoder also has a queue (of frames to encode). If you are rendering animation at 30fps run encoder.encode(frame) on each render, but the encoder is only able to encode at 10 fps, the encoder queue will eventually grow until it runs out of video memory and the process crashes.
You therefore need to manage how and when you sent frames to the encoder, checking encoder.encodeQueueSize within your render loop, so that the render itself waits for the encoder queue is within bounds, which we’ll see below.
Encoding Loop
Section titled “Encoding Loop”Okay, enough theory, let’s get to encoding an actual video with a proper encoding loop. Here, to keep it simple, we’ll programatically generate a video, by just including a single canvas and drawing the current frame, and rendering 300 frames.
const canvas = new OffscreenCanvas(640, 360);const ctx = canvas.getContext('2d');const TOTAL_FRAMES=300;let frameNumber = 0;let chunksMuxed = 0;const fps = 30;renderFrame(): Next, we’ll create the render function which will render the next frame using ctx 2d.
function renderFrame(){
ctx.fillStyle = '#000'; ctx.fillRect(0, 0, canvas.width, canvas.height); // Draw frame number ctx.fillStyle = 'white'; ctx.font = `bold ${Math.min(canvas.width / 10, 72)}px Arial`; ctx.textAlign = 'center'; ctx.textBaseline = 'middle'; ctx.fillText(`Frame ${frameNumber}`, canvas.width / 2, canvas.height / 2);}ENCODE_QUEUE_LIMIT: Next we’ll define an encoder queue limit to avoid overwhelming the encoder.
const ENCODER_QUEUE_LIMIT = 20;waitForEncoder(): We’ll create a function to wait for the encoder’s queue size to go below the limit, throttling the render function
function waitForEncoder(){    return new Promise(function(resolve){
        if (encoder.encodeQueueSize < ENCODER_QUEUE_LIMIT) return resolve();
function check(){ if(encoder.encodeQueueSize < ENCODER_QUEUE_LIMIT){ resolve(); } else { setTimeout(check, 100); } } check(); })}encodeLoop: The actual render / encode loop
let flushed = false;async function encodeLoop(){
    renderFrame();    await waitForEncoder();
    const frame = new VideoFrame(canvas, {timestamp: frameNumber/fps*1e6});    encoder.encode(frame, {keyFrame: frameNumber %60 ===0});    frame.close();
    frameNumber++;

if(frameNumber === TOTAL_FRAMES) { if (!flushed) encoder.flush(); } else return encodeLoop();}Muxer: We set up the muxer where the video will be encoded.
import {  EncodedPacket,  EncodedVideoPacketSource,  BufferTarget,  Mp4OutputFormat,  Output} from 'mediabunny';

const output = new Output({    format: new Mp4OutputFormat(),    target: new BufferTarget(),});
const source = new EncodedVideoPacketSource('avc');output.addVideoTrack(source);
await output.start();finish(): We’ll put the finish handler to get the output video as a blob
await output.finalize();const buffer = <ArrayBuffer> output.target.buffer;encoder.close();const blob = new Blob([buffer], { type: 'video/mp4' });getBitrate(): The getBitrate function we mentioned earlier
function getBitrate(width, height, fps, quality = 'good') {    const pixels = width * height;
    const qualityFactors = {      'low': 0.05,      'good': 0.08,      'high': 0.10,      'very-high': 0.15    };
    const factor = qualityFactors[quality] || qualityFactors['good'];
// Returns bitrate in bits per second return pixels * fps * factor; }getBestCodec(): For production use, we should detect the best supported codec string rather than hardcoding one. This ensures compatibility across different browsers and devices. See codecs for more details on why this is necessary.
async function getBestCodec() {    const codecs = ['avc1.64003e', 'avc1.4d0034', 'avc1.42003e', 'avc1.42001f'];    const bitrate = getBitrate(width, height, fps, 'good');
    for (const testCodec of codecs) {        const config = {            codec: testCodec,            width,            height,            bitrate,            framerate: fps        };
        const support = await VideoEncoder.isConfigSupported(config);        if (support.supported) {            return testCodec;        }    }
    throw new Error('No supported codec found');}
const codec = await getBestCodec();VideoEncoder: Finally we set up the VideoEncoder
const encoder = new VideoEncoder({    output: function(chunk, meta){        source.add(EncodedPacket.fromEncodedChunk(chunk))        chunksMuxed++;        if(chunksMuxed === TOTAL_FRAMES) finish();    },    error: function(e){        console.warn(e);    }})

encoder.configure({    codec,     width: 640,     height: 360,     bitrate: getBitrate(640, 360, fps, 'good'),     framerate: fps})
Putting this all together, we can finally see an actual video encoding in action
Full Source Code
<!DOCTYPE html><html lang="en"><head>  <meta charset="UTF-8">  <meta name="viewport" content="width=device-width, initial-scale=1.0">  <title>Encode Loop Demo</title>  <style>    body {      font-family: system-ui, -apple-system, sans-serif;      max-width: 800px;      margin: 40px auto;      padding: 0 20px;    }    canvas {      border: 2px solid #333;      display: block;      margin: 20px auto;      background: #000;    }    .controls {      margin: 20px 0;      text-align: center;    }    button {      padding: 12px 24px;      font-size: 16px;      cursor: pointer;      margin: 5px;      border: none;      border-radius: 4px;      background: #2196f3;      color: white;      font-weight: bold;    }    button:hover {      background: #1976d2;    }    button:disabled {      background: #ccc;      cursor: not-allowed;    }    button.download {      background: #4caf50;    }    button.download:hover {      background: #45a049;    }    .stats {      font-family: monospace;      background: #f5f5f5;      padding: 20px;      margin: 20px 0;      border-radius: 4px;    }    .stats-grid {      display: grid;      grid-template-columns: repeat(auto-fit, minmax(200px, 1fr));      gap: 15px;    }    .stat-item {      padding: 10px;      background: white;      border-radius: 4px;      border: 1px solid #ddd;    }    .stat-label {      font-size: 12px;      color: #666;      margin-bottom: 5px;    }    .stat-value {      font-size: 20px;      font-weight: bold;      color: #333;    }  </style>
  <script src="mediabunny.cjs"></script></head><body>

  <canvas id="canvas"></canvas>
  <div class="controls">    <button id="startBtn">Start Encoding</button>    <button id="downloadBtn" class="download" disabled>Download Video</button>  </div>

  <div class="stats">    <h3>Encoding Statistics</h3>    <div class="stats-grid">      <div class="stat-item">        <div class="stat-label">Status</div>        <div class="stat-value" id="status">Ready</div>      </div>      <div class="stat-item">        <div class="stat-label">Frames Rendered</div>        <div class="stat-value" id="framesRendered">0</div>      </div>      <div class="stat-item">        <div class="stat-label">Frames Encoded</div>        <div class="stat-value" id="framesEncoded">0</div>      </div>      <div class="stat-item">        <div class="stat-label">Encode Queue Size</div>        <div class="stat-value" id="queueSize">0</div>      </div>      <div class="stat-item">        <div class="stat-label">Progress</div>        <div class="stat-value" id="progress">0%</div>      </div>      <div class="stat-item">        <div class="stat-label">Encoding FPS</div>        <div class="stat-value" id="encodingFps">0</div>      </div>    </div>  </div>
  <script type="module">


const {      EncodedPacket,      EncodedVideoPacketSource,      BufferTarget,      Mp4OutputFormat,      Output    } =  Mediabunny;  // CJS import


    // UI Elements    const canvas = document.getElementById('canvas');    const ctx = canvas.getContext('2d');    const startBtn = document.getElementById('startBtn');    const downloadBtn = document.getElementById('downloadBtn');
    // Stats elements    const statusEl = document.getElementById('status');    const framesRenderedEl = document.getElementById('framesRendered');    const framesEncodedEl = document.getElementById('framesEncoded');    const queueSizeEl = document.getElementById('queueSize');    const progressEl = document.getElementById('progress');    const encodingFpsEl = document.getElementById('encodingFps');
    // Configuration    const CANVAS_WIDTH = 640;    const CANVAS_HEIGHT = 360;    const TOTAL_FRAMES = 300;    const FPS = 30;    const ENCODER_QUEUE_LIMIT = 20;
    // Setup canvas    canvas.width = CANVAS_WIDTH;    canvas.height = CANVAS_HEIGHT;
    // State    let encoder = null;    let output = null;    let source = null;    let frameNumber = 0;    let chunksMuxed = 0;    let encodingStartTime = 0;    let videoBlob = null;    let flushed = false;
    // Render a frame to the canvas    function renderFrame() {      ctx.fillStyle = '#000';      ctx.fillRect(0, 0, canvas.width, canvas.height);
      // Draw frame number      ctx.fillStyle = 'white';      ctx.font = `bold ${Math.min(canvas.width / 10, 72)}px Arial`;      ctx.textAlign = 'center';      ctx.textBaseline = 'middle';      ctx.fillText(`Frame ${frameNumber}`, canvas.width / 2, canvas.height / 2);    }
    // Wait for encoder queue to be below limit    function waitForEncoder() {      return new Promise(function(resolve) {        if (encoder.encodeQueueSize < ENCODER_QUEUE_LIMIT) return resolve();
        function check() {          if (encoder.encodeQueueSize < ENCODER_QUEUE_LIMIT) {            resolve();          } else {            setTimeout(check, 100);          }        }        check();      });    }
    // Calculate bitrate based on resolution and quality    function getBitrate(width, height, fps, quality = 'good') {      const pixels = width * height;      const qualityFactors = {        'low': 0.05,        'good': 0.08,        'high': 0.10,        'very-high': 0.15      };      const factor = qualityFactors[quality] || qualityFactors['good'];      return pixels * fps * factor;    }
    // Main encoding loop    async function encodeLoop() {      renderFrame();      framesRenderedEl.textContent = frameNumber + 1;
      await waitForEncoder();
      const timestamp = (frameNumber / FPS) * 1e6; // Convert to microseconds      const frame = new VideoFrame(canvas, { timestamp });      encoder.encode(frame, { keyFrame: frameNumber % 60 === 0 });      frame.close();
      frameNumber++;
      // Update stats      const progress = Math.round((frameNumber / TOTAL_FRAMES) * 100);      progressEl.textContent = progress + '%';      queueSizeEl.textContent = encoder.encodeQueueSize;
      if (frameNumber === TOTAL_FRAMES) {        if (!flushed) encoder.flush();        flushed = true;      } else {        return encodeLoop();      }    }
    // Finish encoding and create downloadable blob    async function finish() {      statusEl.textContent = 'Finalizing...';
      await output.finalize();      const buffer = output.target.buffer;      encoder.close();      videoBlob = new Blob([buffer], { type: 'video/mp4' });
      queueSizeEl.textContent = 0;
      const elapsed = (performance.now() - encodingStartTime) / 1000;      const fps = TOTAL_FRAMES / elapsed;
      statusEl.textContent = 'Complete';      encodingFpsEl.textContent = fps.toFixed(1);      downloadBtn.disabled = false;
    }
    // Start encoding process    async function startEncoding() {      startBtn.disabled = true;      downloadBtn.disabled = true;      statusEl.textContent = 'Encoding...';      frameNumber = 0;      chunksMuxed = 0;      flushed = false;      encodingStartTime = performance.now();
      // Setup output (muxer)      output = new Output({        format: new Mp4OutputFormat(),        target: new BufferTarget(),      });
      source = new EncodedVideoPacketSource('avc');      output.addVideoTrack(source);      await output.start();
      // Setup encoder      encoder = new VideoEncoder({        output: function(chunk, meta) {          source.add(EncodedPacket.fromEncodedChunk(chunk), meta);          chunksMuxed++;          framesEncodedEl.textContent = chunksMuxed;          if (chunksMuxed === TOTAL_FRAMES) finish();        },        error: function(e) {          console.error('Encoder error:', e);          statusEl.textContent = 'Error: ' + e.message;        }      });
      const bitrate = getBitrate(CANVAS_WIDTH, CANVAS_HEIGHT, FPS, 'good');
      encoder.configure({        codec: 'avc1.42003e',        width: CANVAS_WIDTH,        height: CANVAS_HEIGHT,        bitrate: bitrate,        framerate: FPS      });
      // Start encoding loop      await encodeLoop();    }
    // Download the encoded video    function downloadVideo() {      if (!videoBlob) return;
      const url = URL.createObjectURL(videoBlob);      const a = document.createElement('a');      a.href = url;      a.download = 'encoded-video.mp4';      document.body.appendChild(a);      a.click();      document.body.removeChild(a);      URL.revokeObjectURL(url);    }
    // Event listeners    startBtn.addEventListener('click', startEncoding);    downloadBtn.addEventListener('click', downloadVideo);
    // Update queue size periodically    setInterval(() => {      if (encoder && encoder.state === 'configured') {        queueSizeEl.textContent = encoder.encodeQueueSize;      }    }, 100);  </script></body></html>