How to transcode video with WebCodecs
In the Video Decoder section, we learned how to decode video, and in the Video Encoder section, we learned how to encode video, and so naturally you’d think that transcoding is just chaining those two things together.
Conceptually yes, transcoding is just chaining a decode process to an encode process, but as we discussed earlier, a VideoEncoder and VideoDecoder aren’t simple async calls, but rather more like Rube Goldberg machines that you have to push chunks and frames through.
To properly implement transcoding in WebCodecs, we can’t just think of it as a simple for loop:
//Pseudocode. This is NOT how transcoding worksfor (let i=0; i< numChunks; i++){ const chunk = await demuxer.getChunk(i); const frame = await decoder.decodeFrame(frame); const processed = await render(frame); const encoded = await encoder.encode(processed); muxer.mux(encoded);}Instead, we need to think of it as a pipeline, where you are chaining stages together, and each stage is simultaneously holding multiple chunks or frames.
As we’ll see in this section, I’m not mentioning pipelines just as an analogy, we’ll build a Javascript transcoding pipeline via the Streams API.
Stages in our Pipeline
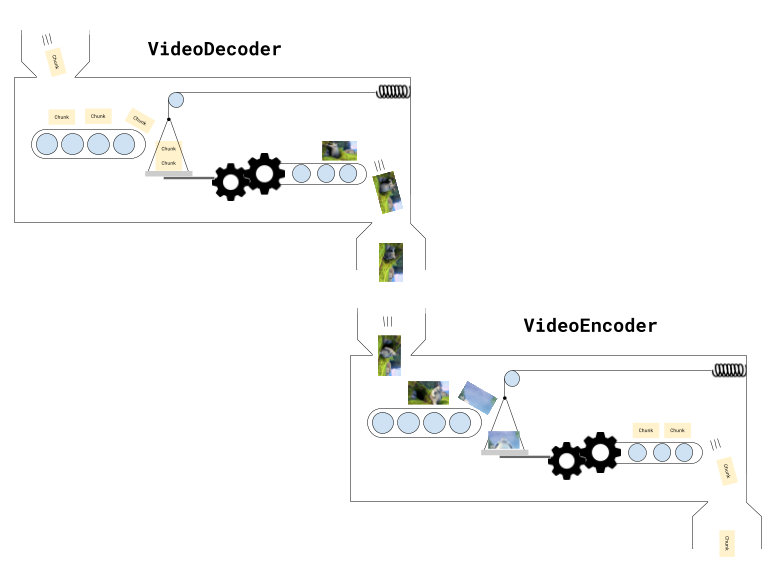
Section titled “Stages in our Pipeline”In reality, our pipeline is more than just a decoder and an encoder, there are actually 5 stages.
File Reader: First, we need to read EncodedVideoChunk objects from the file. While in previous examples we’ve loaded the entire video’s worth of chunks at once, in production we want to read EncodedVideoChunk objects progressively, ideally as a “Read Stream”, where we’re streaming chunks from the file’s hard disk. The demuxing library web-demuxer explicitly returns a Javascript ReadableStream while Mediabunny does streaming internally, but both read from the source file on hard disk and return a stream of EncodedVideoChunk objects.

Decoding: Next we need to decode the EncodedVideoChunk objects into VideoFrame, consider this a ‘data transformation’ stage of the pipeline.

Render: You may optionally want to do some kind of processing on the frame, like adding a filter, taking in one VideoFrame and returning another VideoFrame object.

Encoding You then need to take in the VideoFrame objects, and encode them, and return EncodedVideoChunk objects.

Muxing Finally, we need to take each EncodedVideoChunk object and mux it by inserting the data and metadata into an ArrayBuffer or potentially to an actual file on hard disk. You would consider this a ‘write stream’.

Overall this gives us a complete transcoding pipeline of 5 stages, from the source file to the destination file:

Beyond just piping data through, we also need to make sure we manage constraints, by making sure that:
- We limit the number of active
VideoFrameobjects in memory - We limit the encoder’s encode queue
- We limit the decoder’s decode queue
- We don’t read the entire file’s worth of content at once
Javascript Streams API
Section titled “Javascript Streams API”The browser’s Streams API is perfectly designed for building transcoding pipelines. It provides three key stream types:
- ReadableStream - Read data from a source in chunks (e.g., demuxer reading from file)
- WritableStream - Write data to a destination in chunks (e.g., muxer writing to file)
- TransformStream - Transform chunks from one type to another (e.g., decoder, encoder)
You can chain these streams together to form a complete pipeline:
const transcodePipeline = chunkReadStream    .pipeThrough(new VideoDecoderStream(videoDecoderConfig))    .pipeThrough(new VideoRenderStream())    .pipeThrough(new VideoEncoderStream(videoEncoderConfig))    .pipeTo(createMuxerWriter(muxer));
await transcodePipeline;
The Streams API automatically handles backpressure—when downstream stages (like encoding) can’t keep up, upstream stages (like file reading) automatically slow down. This prevents memory overflow while maximizing throughput.
For a detailed explanation of the Streams API, including backpressure, highWaterMark, and complete stream implementations, see the Streams API primer.
Transcoding Stream implementation
Section titled “Transcoding Stream implementation”Now let’s go ahead and walk through a code example where we actually build such a pipeline, and put it in an async transcodeVideo() function.
File Reader
Section titled “File Reader”Here we’ll use web-demuxer since it integrates really nicely with the Streams API. First we load the demuxer
import { WebDemuxer } from 'web-demuxer';const demuxer = new WebDemuxer({ wasmFilePath: "https://cdn.jsdelivr.net/npm/web-demuxer@latest/dist/wasm-files/web-demuxer.wasm",});await demuxer.load(<File> file);Then we just create a ReadableStream with demuxer.read
const chunkStream = <ReadableStream> demuxer.read('video', 0);DemuxingTracker
Section titled “DemuxingTracker”Next we’ll add an intermediate utility TransformStream which will do two things:
- We will count the chunks (we get
chunkIndex) which we’ll use in theVideoEncoder - We apply a
highWaterMarkto throttle the reader, and limit it to 20 chunks in memory
class DemuxerTrackingStream extends TransformStream<EncodedVideoChunk, { chunk: EncodedVideoChunk; index: number }> {  constructor() {    let chunkIndex = 0;    super({        async transform(chunk, controller) {
          // Apply backpressure if downstream is full          while (controller.desiredSize !== null && controller.desiredSize < 0) {            await new Promise((r) => setTimeout(r, 10));          }
          // Pass chunk with index          controller.enqueue({ chunk, index: chunkIndex++ });        },      },      { highWaterMark: 20 } // Buffer up to 20 chunks from demuxer    );  }}
Decoder
Section titled “Decoder”Next, we’ll add a DecoderStream, where we setup the decoder in start (which gets called at initialization), submit chunks for decoding in transform and flush the decoder in flush.
Note that there is a controller being passed both to start and to transform, and this lets define how we send chunks to the next stage in the decoder initialization in start() while also sending chunks for decoding in transform().
The TransformStream class also has a flush method which will automatically be called when the stream has no more inputs to process, and we just pass that flush call to decoder.flush(). Is that not elegant?
class VideoDecoderStream extends TransformStream<{ chunk: EncodedVideoChunk; index: number }, { frame: VideoFrame; index: number }> {  constructor(config: VideoDecoderConfig) {    let pendingIndices: number[] = [];    super(      {        start(controller) {          decoder = new VideoDecoder({            output: (frame) => {              const index = pendingIndices.shift()!;              controller.enqueue({ frame, index });            },            error: (e) => controller.error(e),          });
          decoder.configure(config);        },
        async transform(item, controller) {
         // limit decoder queue          while (decoder.decodeQueueSize >= 20) {            await new Promise((r) => setTimeout(r, 10));          }
          // check for downstream backpressure          while (controller.desiredSize !== null && controller.desiredSize < 0) {            await new Promise((r) => setTimeout(r, 10));          }
          // Track this frame's index and decode          pendingIndices.push(item.index);          decoder.decode(item.chunk);        },
        async flush(controller) {          await decoder.flush();          if decoder.state !== 'closed' decoder.close();        },      },      { highWaterMark: 10 } // Buffer up to 10 frames before applying backpressure    );  }}
Render Stream
Section titled “Render Stream”Here we’ll add a a placeholder for if you want to do any custom processing on the frame (like adding a filter). For the demo we’ll just pass the item through.
class VideoRenderStream extends TransformStream<{ frame: VideoFrame; index: number }, { frame: VideoFrame; index: number }> { constructor() { super( { async transform(item, controller) { /* This is where you'd do custom processing on the frame, e.g. render(item.frame) const frame = new VideoFrame(canvas, {timestamp: item.frame.timestamp}) item.frame.close(); controller.enqueue({ frame, index: item.index }); //*/ controller.enqueue(item); }, }, { highWaterMark: 5 } // Keep render buffer small ); }EncodeStream
Section titled “EncodeStream”Next we’ll add the Encoder stream, which is a wrapper around VideoEncoder similar to the decoder transform stream. Here, again, we’re rate limiting based on backpressure
class VideoEncoderStream extends TransformStream<  { frame: VideoFrame; index: number },  { chunk: EncodedVideoChunk; meta: EncodedVideoChunkMetadata }> {  constructor(config: VideoEncoderConfig) {    super(      {        start(controller) {          encoder = new VideoEncoder({            output: (chunk, meta) => {              controller.enqueue({ chunk, meta });            },            error: (e) => controller.error(e),          });          encoder.configure(config);        },
        async transform(item, controller) {          // Backpressure checks BEFORE encoding:          // 1. Check encoder's internal queue          while (encoder.encodeQueueSize >= 20) {            await new Promise((r) => setTimeout(r, 10));          }          // 2. Check downstream backpressure (TransformStream buffer)          while (controller.desiredSize !== null && controller.desiredSize < 0) {            await new Promise((r) => setTimeout(r, 10));          }          // Encode with keyframe every 60 frames          encoder.encode(item.frame, { keyFrame: item.index % 60 === 0 });          item.frame.close();        },
        async flush(controller) {          await encoder.flush();          if (encoder.state !== 'closed') encoder.close();        },      },      { highWaterMark: 10 }    );  }}
MuxStream
Section titled “MuxStream”Finally we’ll create a WritableStream we can pipe to. Here we’ll use mp4-muxer and a StreamTarget which will tell the muxer to stream chunks to the destination (which could be a file as in a FileSystemWriteableFileStream), but I’ll use InMemoryStorage which has the same API as a file write stream but just writes to a blob so you can use the same code whether or not writing to disk or to an in-memory blob.
import { Muxer, StreamTarget } from 'mp4-muxer'import {InMemoryStorage} from 'webcodecs-utils'
const storage = new InMemoryStorage();
const target = new StreamTarget({    onData: (data: Uint8Array, position: number) => {        storage.write(data, position);    },    chunked: true,    chunkSize: 1024*1024*10});
Then you’d create the actual muxer
const muxer = new Muxer({ target, video: { codec: 'avc', width, height, }, firstTimestampBehavior: 'offset', fastStart: 'in-memory', })And then finally you’d create a WriteStream wrapper around the muxer
function createMuxerWriter( muxer: Muxer<StreamTarget>): WritableStream<{ chunk: EncodedVideoChunk; meta: EncodedVideoChunkMetadata }> { return new WritableStream({ async write(value) { muxer.addVideoChunk(value.chunk, value.meta); } });}Full pipeline
Section titled “Full pipeline”Then you’d finally do
  const encodedPipeline = chunkStream    .pipeThrough(new DemuxerTrackingStream())    .pipeThrough(new VideoDecoderStream(videoDecoderConfig))    .pipeThrough(new VideoRenderStream())    .pipeThrough(new VideoEncoderStream(videoEncoderConfig))    .pipeTo(createMuxerWriter(muxer));
  await encodedPipeline;
And that’s it! Isn’t that elegant?
Okay, that’s not 100% true, we still need the audio. We can create our audio mux wrapper
function createAudioMuxerWriter( muxer: Muxer<StreamTarget>): WritableStream<EncodedAudioChunk> { return new WritableStream({ async write(chunk) { muxer.addAudioChunk(chunk); } });}And our audio read stream
const audioStream = <ReadableStream<EncodedAudioChunk>> demuxer.read('audio', 0);And then we just pipe them together
await audioStream.pipeTo(createAudioMuxerWriter(muxer));And now we’re done!
Here’s the full pipeline in code:
import { getBitrate, InMemoryStorage, getCodecString } from 'webcodecs-utils';import { WebDemuxer } from "web-demuxer";import { Muxer, StreamTarget } from 'mp4-muxer';
export async function transcodePipeline( file: File, ): Promise<Blob> {
  // Step 1: Set up demuxer
  const demuxer = new WebDemuxer({wasmFilePath: "https://cdn.jsdelivr.net/npm/web-demuxer@latest/dist/wasm-files/web-demuxer.wasm"});  await demuxer.load(<File> file);

// Step 2: Extract metadata  const mediaInfo = await demuxer.getMediaInfo();  const videoTrack = mediaInfo.streams.filter((s)=>s.codec_type_string === 'video')[0];  const audioTrack = mediaInfo.streams.filter((s)=>s.codec_type_string === 'audio')[0];

  const duration = videoTrack.duration;  const width = videoTrack.width;  const height = videoTrack.height;

  const videoDecoderConfig = await demuxer.getDecoderConfig('video');  const audioConfig = await demuxer.getDecoderConfig('audio');


  // Step 3: Set up muxer  const storage = new InMemoryStorage();
  const target = new StreamTarget({        onData: (data: Uint8Array, position: number) => {        storage.write(data, position);        },        chunked: true,        chunkSize: 1024*1024*10    });

  const muxerOptions: any = {    target,    video: {      codec: 'avc',      width,      height,    },    firstTimestampBehavior: 'offset',    fastStart: 'in-memory',  };
  if (audioConfig) {    muxerOptions.audio = {      codec: 'aac',      numberOfChannels: audioConfig.numberOfChannels,      sampleRate: audioConfig.sampleRate,    };  }
  const muxer = new Muxer(muxerOptions);
  // Step 4: Configure encoder  const bitrate = getBitrate(width, height, 30, 'good');
  const videoEncoderConfig: VideoEncoderConfig = {    codec: getCodecString('avc', width, height, bitrate),    width: width,    height: height,    bitrate: Math.round(bitrate),    framerate: 30,  };
  // Step 5: Build the pipeline  // Get the native ReadableStream from web-demuxer  const chunkStream = <ReadableStream> demuxer.read('video', 0);
  // Build the pipeline with automatic backpressure  const encodePipeline = chunkStream    .pipeThrough(new DemuxerTrackingStream())    .pipeThrough(new VideoDecoderStream(videoDecoderConfig))    .pipeThrough(new VideoRenderStream())    .pipeThrough(new VideoEncoderStream(videoEncoderConfig))    .pipeTo(createVideoMuxerWriter(muxer));
  // Step 6: Await for pipeline  await encodePipeline;
  // Step 7: Pipe audio to muxer writer (pass-through, no transcoding)  if (audioConfig) {    const audioStream = <ReadableStream<EncodedAudioChunk>> demuxer.read('audio', 0);    const audioWriter = createAudioMuxerWriter(muxer);    await audioStream.pipeTo(audioWriter);  }
  // Step 8: Finalize  muxer.finalize();
  const blob = storage.toBlob('video/mp4');
  return blob;}
Transcoding Demo
Section titled “Transcoding Demo”As we discussed in the pipeline section, we’ll use H264 / AVC to transcode the video using the same height/width and standard bitrate settings, outputting at 30fps.
Here’s the vibe coded demo:
You can find the source code for the transcode function here. You can find the source code for the demo here: html, js